Getting Started With Actian Data Platform on Azure
Actian Corporation
October 21, 2019
Actian Data Platform (formerly Avalanche) on Microsoft Azure launched this week with a free cloud storage offer. This post will walk you through getting set up on Actian Data Platform on Azure. You must first have an Actian account as a customer of Actian or have signed up for a free trial.
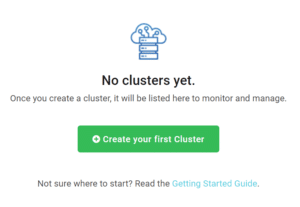
After you log in to the Actian service, you will see the below screen in the center of the Actian console:
To create your first warehouse, click the green Create your first Cluster button, which will load the below screen to get you set up:
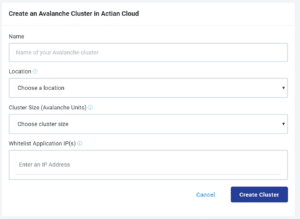
All fields depicted above are required fields. After filling in the name of your cluster and location (e.g. East US for where your cluster will be located), you will also need to provide what size cluster you would like to create and enter an IP address to allow access.
For the cluster size, Actian uses Avalanche Units (AU) to specify the size of your warehouse. AUs are a representation of the cluster’s size, so 2AUs would be a small cluster, and 4AUs would be a larger cluster. Actian offers up to 128AU clusters. AU size of the cluster is not directly linked to the data storage size; your data storage will scale independently of the compute for the cluster. If you are using a trial, Actian recommends using a 2AU cluster to get started, as larger clusters have higher costs. Since the a is associated with a specified amount of credits, a 2AU cluster will provide the maximum amount of time for you to work with Actian.
For the IP address field, if you will be connecting to the cluster from your current location, you can click the Allow List Application IP(s) field, and a small box will pop up that states Use my IP – if you select that box, your IP will auto-populate into the IP address field. The IP address that needs to be added on the Allow List is the IP address that you will be using to connect to the Actian cluster via ODBC, JDBC, or .Net applications.
Once you are done with filling in the fields, click on the Create Cluster button. You will then be taken to the main dashboard and see the status of your cluster as Creating.

After the instance is provisioned, which will take about 10-15 minutes, the Creating indicator will change to Running as shown below:
![]()
The Actian cluster is now available to connect to and perform some of the following activities: loading data, performing ad-hoc querying, using BI tools such as Power BI or Tableau for reporting, or loading data into a Spark cluster or into a Data Science workbench.
To get started on your journey to connect to Actian for Azure, you will need to:
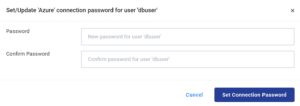
- Set a connection password in the Actian web interface.
- On the Actian main console, identify the cluster whose password you want to change.
- From the cluster’s Manage menu, select Set Connection Password.
- The Set/Update Connection Password dialog opens:
-
-
- Enter and confirm the password for the dbuser user.
- Click Set Connection Password.
- The connection password is now in effect.
-
- Download a JDBC or Actian client runtime package.
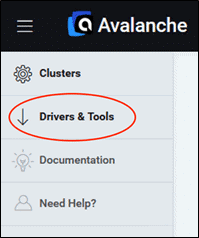
- To download drivers for Actian, log in to the web console and click the Driver & Tools link, which opens Electronic Software Delivery (ESD) in a new browser tab.
-
- The following download packages are available from the RELEASE dropdown for Actian.
- Actian JDBC (for any platform): includes the JDBC driver to connect to Actian from JDBC applications. To download and install this package, see Download the Actian JDBC Package.
- Actian Client Runtime: includes the JDBC driver, ODBC driver, and the Actian SQL Command Line Interface (CLI). To download and install this package, see Download the Actian Client Runtime Package.
- If you download an RPM package, you must install as root.
- The following download packages are available from the RELEASE dropdown for Actian.
- To connect from your favorite BI tools such as Power BI, Tableau, Looker, or your favorite SQL tools such as DBeaver and Squirrel SQL, or an application that uses ODBC/JDBC, you will need information specific to the application to connect. To get the information required, navigate to the cluster that you would like to connect to, and select the Manage menu and then select the Connect button.
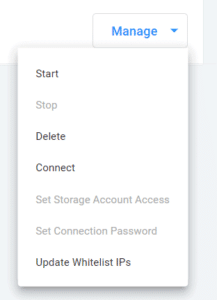
- After pressing the Connect button, a dialog will appear on-screen that provides the connection details.
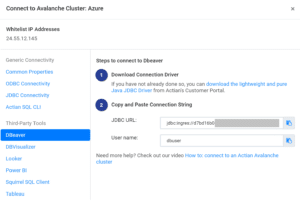
The connection string can be copied via the copy button on the right of the connection string field. Once copied, the string can be pasted into the tool you plan to connect to Actian after the Actian driver is installed and connected. - For more details on how to install the driver for an example application such as DBeaver, please refer to the following how-to link: Install DBeaver and Set Up an Actian Data Platform Driver guide.
The cluster will have sample data available to use for running SQL commands or building visualizations for your favorite query tools. For SQL commands, you can find a set of sample commands here.
If you have additional questions on getting set up with Actian, please feel free to reach out to the support team.
Subscribe to the Actian Blog
Subscribe to Actian’s blog to get data insights delivered right to you.
- Stay in the know – Get the latest in data analytics pushed directly to your inbox
- Never miss a post – You’ll receive automatic email updates to let you know when new posts are live
- It’s all up to you – Change your delivery preferences to suit your needs